- RNG Mechanics
- Home
- RNG Mechanics
- Battling
- Guides
- Battle Challenges
|
Egg RNG in Generation 7: Guide (Windows users)
- Introduction
- Egg RNG (Windows users)
- Finding your Egg seed
- Using 3DS RNG Tool
- Finding and obtaining the Egg you want
- Step-by-step example
- Egg RNG (macOS users)
- Additional resources
2.1. Finding your Egg seed
The biggest hurdle to navigating your Egg chain is knowing where you're starting from (what your current Egg seed is). To most people, this is by far the longest part of the process, as you will have to go through the grueling task of hatching 127 Magikarp Eggs. However, for the lucky few who have never previously bred in their game (not a single Egg), a much shorter alternative is possible. If this is your case, skip ahead to Method 2!
Method 1: 127 Magikarp (if you have bred in your game before)
- Catch a male and a female Magikarp with different natures, and take note of which nature belongs to which gender. Attach an Everstone to both of them. Everstones can be obtained from wild Roggenrola at Ten Carat Hill (they have a 50% chance of holding them).
- Deposit both Magikarp at the nursery.
- Run until the nursery lady is holding an Egg. Do not talk to her yet.
- Save the game, then accept the Egg and hatch it.
- Check the nature of the hatchling. If it has the male's nature, note down a 0 in a blank Notepad document or similar; if it has the female's nature, note down a 1.
- Soft-reset the game (L+R+Start).
- You should be next to the nursery lady holding the Egg; talk to her and refuse it.
- Repeat steps 3-7 126 times (!), writing down a new number next to the previous one every time. You will end up with a string of 127 0s and 1s. At this point, your in-game character should be standing next to the nursery lady, having just refused the 127th Egg.
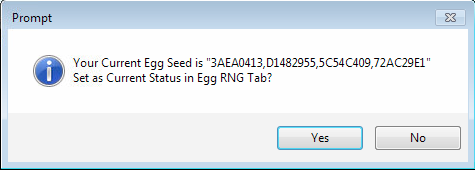
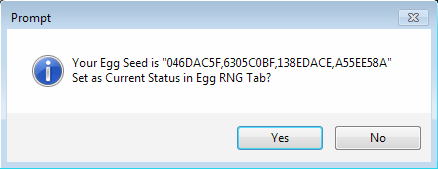
- Open 3DS RNG Tool, click the "Egg RNG" tab, go to the Tools menu, and click "Gen7 Egg Seed Finder". In the "127 Magikarp Calculator" box, paste the string of 127 0s and 1s you collected, then click the "Go!" button. The program will give you a seed comprised of four parts and offer you to set it as your current seed; accept. Despite what the prompt tells you, this is not your actual current Egg seed, but we will use it to find it.

- Go inside the nursery and take both Magikarp out, remove the Everstones, and deposit them again.
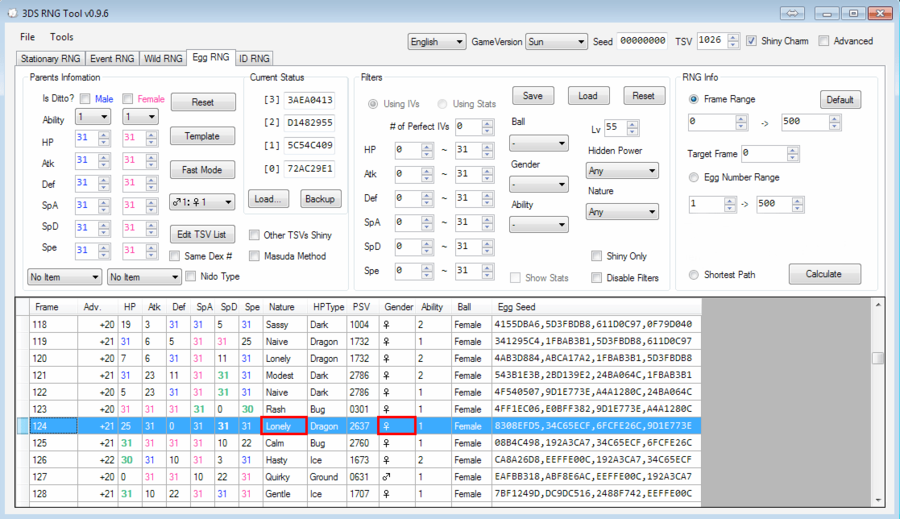
- In 3DS RNG Tool, make sure the radio button on the right under "RNG Info" is set to "Frame Range", and click the "Calculate" button. The program will display a list of Eggs, numbered by the "Frame" listed on the left. Scroll down to frame 124 and take note of the nature and gender of that Egg.
- Step outside the nursery and run until the nursery lady is holding a new Egg. Save the game, and then accept the Egg.
- This is it; this is where we find out whether everything was done correctly... now is the time to break a sweat. If all is good, you will have your seed and be able to use Egg RNG indefinitely. Take a deep breath and hatch the Egg. Curl up your toes as you watch yet another Magikarp break free. Check the nature and gender of your new Magikarp; if they correspond to those noted on step 11, congratulations, you're almost done and may now proceed to step 14! If not, you most likely made a small mistake somewhere along the string of 0s and 1s, and you will probably never know where; you unfortunately need to start again.
- Soft reset and refuse the Egg the nursery lady is holding. Take back both Magikarp and feel free to release them to join their 127 new offspring in the wild. Or maybe you want to thank them for all their help with a couple of delicious beans in Pokémon Refresh? This is up to you, really!
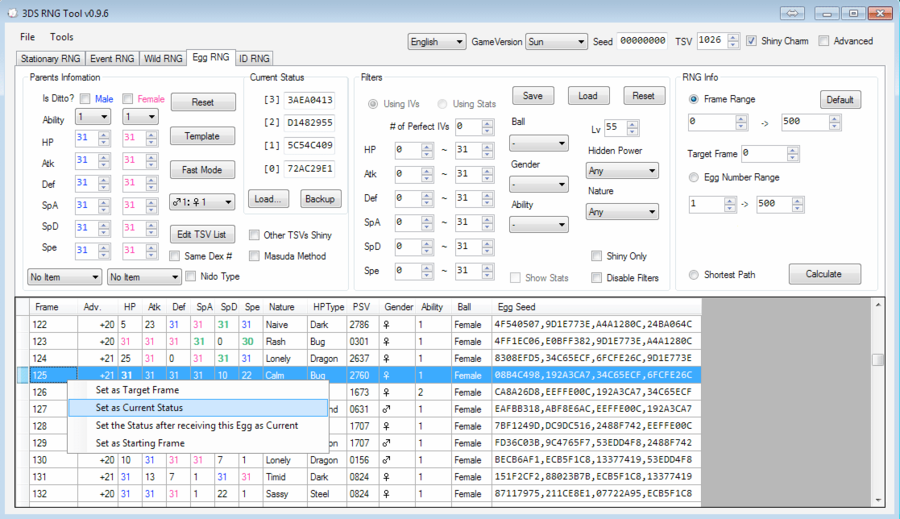
- In 3DS RNG Tool, scroll down to frame 125 (just under the one you used as a test; since you just refused this Egg, you advanced in the chain by one frame), right-click it, and choose "Set as Current Status".
This is your Egg seed/status, where your Egg RNG journey begins! You are now ready to search for upcoming Eggs. Clicking "Backup" under the "Current Status" is a good idea now, and whenever you progress to a new seed. You don't want to lose what you worked so hard to obtain!
Method 2: 8 Eggs (if you have never bred in your game before)
- Catch a Ditto (found in the grass of Mount Hokulani) and a Magikarp (found by fishing in most spots, in Brooklet Hill for example). If you already have a Ditto, you can use it, but make sure its region is the same as yours (don't use a foreign Ditto for this!).
- Go to the Nursery Center and deposit both the Ditto and the Magikarp without any items attached. If you haven't received the Eevee Egg yet, you will need to accept if before depositing the parents; the Eevee doesn't count as a bred Egg, so you are free to do whatever you wish with it.
- Run outside the nursery center until the lady is holding an Egg for you; accept it, hatch it, and note down the nature of the Magikarp.
- Repeat this process 7 times. You may accept several Eggs before hatching them, but you need to make sure to note down the natures in the order the Eggs were received. Once you have accepted the 8th Egg, go back inside the nursery and take back the parents; don't let the parents generate a 9th egg!
- Open 3DS RNG Tool. If you have obtained the Shiny Charm, make sure to tick the box that says "Shiny Charm" on top; if you don't have it, make sure the box is unchecked.
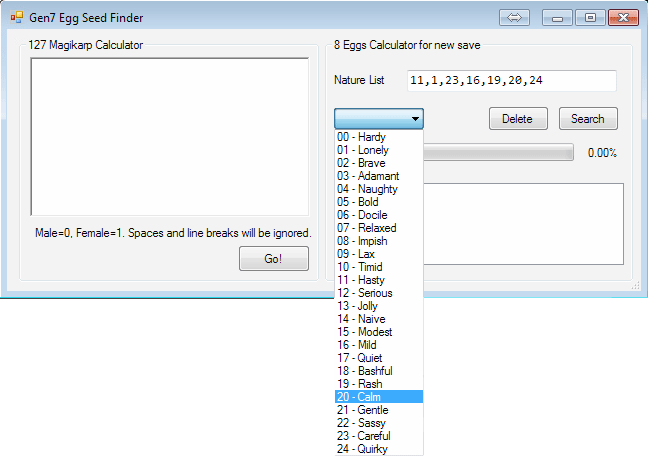
- In the Tools menu, click "Gen7 Egg Seed Finder". On the right, under "Nature List", use the dropdown menu to pick the 8 natures of your Magikarp in the order they hatched, then press "Search". The search will take a few minutes and should return one result. When the search is completed, a prompt will ask whether you want to set the result as your current seed; accept. This is not your actual current Egg seed, but we will use it to find it.
- In the main window of 3DS RNG Tool, go to the "Egg RNG" tab and set the radio button on the right to "Egg Number Range", and then click "Calculate". In the results, have a look at the "Nature" column. The first 8 natures listed should correspond to those of the Magikarp you just hatched. Right-click the 8th Egg's row and select "Set the Status after receiving this Egg as Current".

You have found your Egg seed/status, where your Egg RNG journey begins! You are now ready to search for upcoming Eggs. Clicking "Backup" under the "Current Status" is a good idea now and whenever you progress to a new seed.
Tips and tricks:
- Magikarp are used because they hatch the fastest; this method could be used with different Pokémon as well.
- Having a Pokémon with the ability Flame Body or Magma Armor (such as Magby, Magcargo, or Volcarona) in your party will make Eggs hatch twice as fast.
- Route 6 down from the nursery is a long straight line, making it ideal to run along with Tauros and hatch Eggs without turning often. Hatching one Magikarp will only require you to go back and forth twice through the Route (with Flame Body/Magma Armor in your party).
- Those using the 127 Magikarp method may want to plan the time they do it in advance. It requires about 3 to 4 hours of concentration while doing a repetitive task and making sure not a single error is made. Be careful of multitasking (such as watching videos at the same time) because taking your attention away will eventually make you doubt the order of your actions and could ruin your chain. Listening to music is probably a less dangerous way to make the process less boring!
2.2. Using 3DS RNG Tool
To proceed and find the Eggs you want using 3DS RNG Tool, you will need to input all necessary information on the parents you deposit and know how to filter your search. The application may appear intimidating at first, with so many input boxes and options, but once you become more familiar with it, you will find it's actually quite simple and convenient. Here is a breakdown of what you will see in the Egg RNG tab:
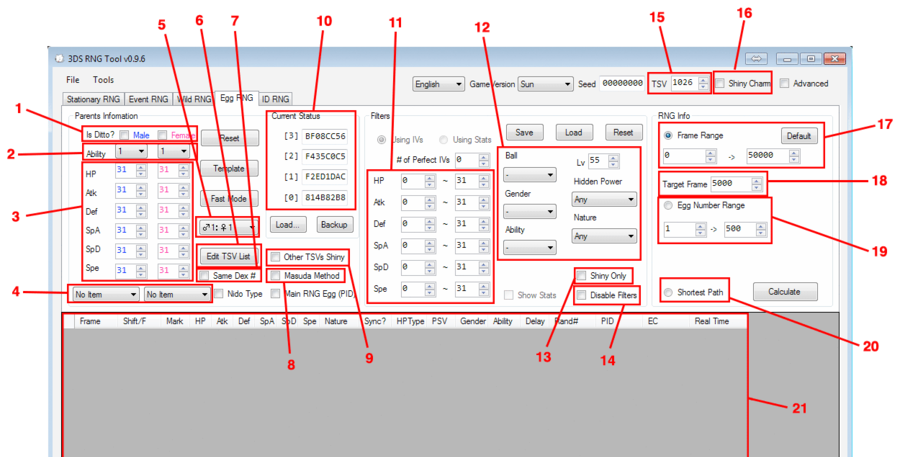
- Check one of these boxes if you are breeding with a Ditto. You need to indicate whether Ditto is used to substitute the male or the female parent. In the case of a genderless Pokémon, Ditto will always be the female. Every column under the "Male" and "Female" boxes should reflect the attributes of that one parent.
- Pick the ability of each parent, with "H" representing the hidden ability. If the Pokémon only has one regular ability, picking 1 or 2 makes no difference. Otherwise, the first ability listed in common resources corresponds to slot 1, and the second corresponds to slot 2; for example, Clefairy's slot 1 ability is Cute Charm, and its slot 2 ability is Magic Guard.
- Enter the parents' IVs here. If some are unknown, you can substitute them with a "1"; whenever that IV is passed from the parent, it will also show as a "1" in the Egg listing and shouldn't interfere with your filters. The ones you will definitely want to enter are the 31s, 30s, and 0s.
- Pick which Pokémon is holding which item (you will usually want one of them to be holding an Everstone to pass down the nature, and the other a Destiny Knot to pass down 5 IVs from the parents).
- Pick the Pokémon's gender ratio. This is important in predicting whether you will hatch a male or a female.
- This is used to access and edit the list of TSVs you can hatch from (add one TSV per line). Many people have a list of friends, acquaintances or fellow forum users who can hatch Eggs for them, and each have a different TSV. Thus, having a large number of potential TSV hatchers allows you to obtain shiny Pokémon much more easily by increasing the odds of finding Eggs with matching PSVs. You don't have to list your own TSV in there; note it down in field 15 instead. If you're not looking to hatch shiny Pokémon, you can ignore this button entirely.
- Check this button if you are breeding with two parents of the same species (sharing the same Pokédex #). For example, check it if you are breeding a male and female Mareep together, but don't check it if you are breeding a Mareep with an Ampharos.
- Check this box if you are using the Masuda Method, i.e. one of your parents is marked as coming from a foreign region. This is important, even if you aren't trying to hatch a shiny Pokémon. Breeding with foreign Pokémon will yield slightly different results, so it needs to be checked whenever you are using parents from two different regions.
- Check this box if you'd like 3DS RNG Tool to mark any Pokémon whose PSV matches one of those listed in your TSV List (see 6) as shiny. If unchecked, only the ones matching your own TSV will be marked as shiny.
- This is your current Status, or Egg seed. It will need to be updated after you receive the final Egg of a project in order to conduct a new search. Section 3.3 covers the process of updating it. Make sure you use the Backup button every once in a while in order not to lose your current seed!
Fields 11-13 are used when you want to search for an Egg with specific features. If you disable the filters (14), you will see a list of all upcoming Eggs instead.
- Enter the IVs of the Pokémon you want to find. If none of your parents have the right IVs, you shouldn't set your standards too high; try to obtain just few perfect IVs. Afterward, use that new Pokémon as a parent to find even more perfect IVs, and eventually all of them. If you are fortunate enough to have a Ditto with flawless IVs, you can probably afford to set your standards pretty high and set the exact IVs you are looking for here. If you are looking for some specific Hidden Power types, section 4.3 of this guide lists a few common IV spreads you may want to enter here.
- These are various attributes you may be looking for in your hatchling. Only pick the ones that are important to you, as every additional filter will make it harder to find what you want! Before choosing the Ball, you may also want to check section 4.2 of this guide if you are unfamiliar with the breeding mechanics for Balls.
- Check this box if you are looking for a shiny Pokémon. When searching for a shiny, most of your results will probably be very far into the chain (hundreds or thousands of frames away). To avoid having to go too far for one, don't set many other filters (flawless shinies are rare!). Do not use this checkbox if you don't know or haven't entered your TSV in 15. To use this feature, you also need to have received the Shiny Charm (16) or be using the Masuda Method (8).
- If you only want to see the upcoming Eggs and pick among them, simply disable all filters with this checkbox.
- If you know your TSV, enter it here (see section 1.2 of this guide if you don't know what TSV means).
- Check this box if you have obtained the Shiny Charm in-game.
- Place the radio button on "Frame Range" if you want to list or search upcoming Eggs between a certain range (every Egg corresponds to a frame). If you only want to see a list of what's coming, a range of 0 -> 500 is reasonable. If you want to conduct a search using filters, you may want to broaden the search with a greater range. When searching for specific IVs, abilities, or Balls using good parents, 0 -> 1000 is usually plenty. However, if you are looking for shinies, an even greater range is recommended, at least 0 -> 50000. Feel free to explore and experiment with the range, but be careful of using a range greater than 0 -> 500000, as it may cause the application to crash if your computer has a hard time handling a heavier load.
- Use this to set your target frame after finding a result you like.
- Place the radio button on "Egg Number Range" with filters disabled to see a list of upcoming Eggs (granted you accept all of them). With filters enabled, this can be used as an alternative way to set a search range.
- Place the radio button on "Shortest Path" if you found a target frame you want and entered it in "Target Frame". Hitting "Calculate" will then give you the shortest way of obtaining it by accepting and refusing Eggs in a certain order.
- Results of your search will be shown here when you click the "Calculate" button. The type of results will depend on what is selected with the radio button (17, 19 or 20). Some of the columns listed here are meant for other types of RNG (Sync?, Delay, Real Time...). If you don't know what they mean, simply ignore them.
2.3. Finding and obtaining the Egg you want
Now that you understand what everything stands for in the Egg RNG tab of 3DS RNG Tool, you are ready to search for a specific Egg and obtain it! Here is the procedure:
- Pick both parents you will be using to breed and enter all their information by filling in fields 1-9 in 3DS RNG Tool.
- Enter the features of the Pokémon you wish to hatch in fields 11-13. Make sure to be realistic; if you set your standards too high, you may struggle to find results! Also make sure Disable Filters (14) isn't checked.
- Set the radio button to "Frame Range" (17) and make sure the range is appropriate for what you are trying to obtain (see the description of field 17 for examples). The default range of 3DS RNG Tool is 50000, which can be left untouched if you're unsure.
- Click "Calculate", and take a look at the results. If there are too many, you can either be more strict with the filters or reduce the frame range. If there are too few results or none, either be less strict with the filters until you breed better parents or increase the frame range.
- Once you've found an Egg you'd like to obtain, right-click its frame and pick "Set as Target Frame". Field 18 should automatically change to that frame's value.
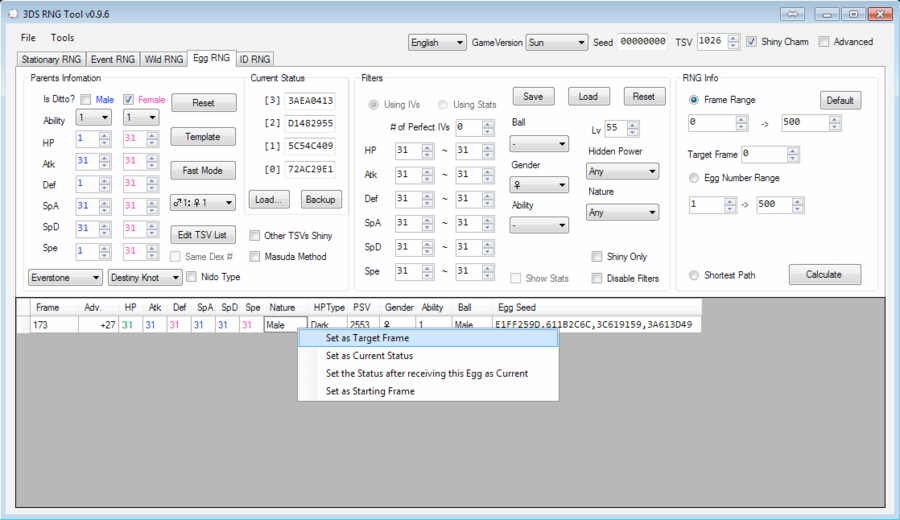
- Change the radio button on the right from "Frame Range" to "Shortest Path" (20) and click "Calculate" once more.
- A list of Eggs to accept and refuse will appear in the results field (21), and the total number of Eggs to accept and refuse will be displayed right under field 19. If other frames corresponded to what you wanted in the initial search, feel free to change the radio button back to "Frame Range" and try out different target frames to see which require you to accept and refuse the least number of Eggs (keep in mind that you will most likely have to hatch all of the Eggs you accept!).
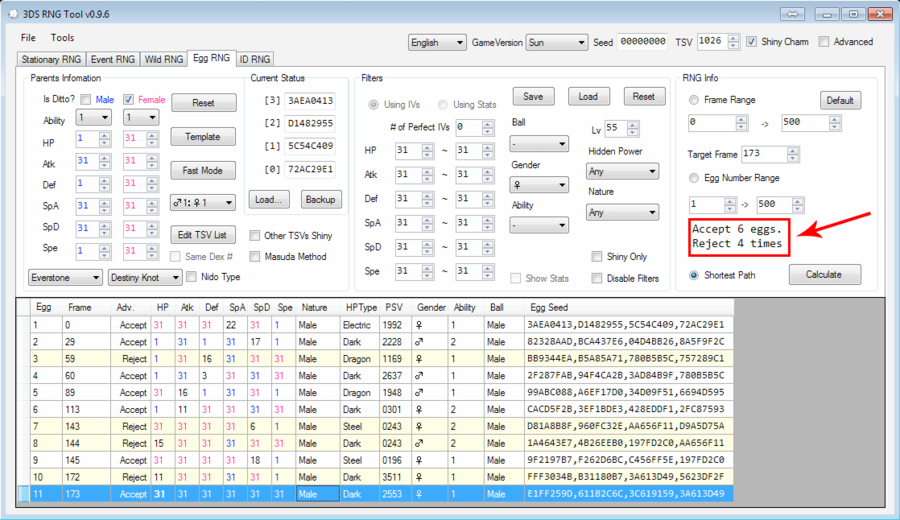
- Once you are content with the number of Eggs to accept and refuse, simply run around the nursery lady, accepting and refusing Eggs in the order shown in the results field (21). This is crucial; if you accept and refuse them in a different order, you will get a different Egg in the end. Saving before starting this process may be a good idea in case something goes wrong.
- The last Egg you accept will be the one you were aiming for. As soon as you've accepted it, take the parents back from the nursery so that no further eggs are generated.
- Hatch the final Egg and make sure it corresponds precisely to the one you wanted. If it does, congratulations, the operation was a success! If it doesn't, there was an error somewhere, and you may want to soft-reset to an earlier state where you knew your Egg seed / status. If you don't know where you are in the chain anymore (i.e. nothing you breed corresponds to the expected results), do not panic and refer to section 4.1 of this guide.
- Right-click on the frame of the final Egg in 3DS RNG Tool and select "Set the Status after receiving this Egg as Current". This will update your current status (10), meaning you are all set to search and find your next Egg! Now would be a good time to backup the current status and save your game in case something goes wrong with your next project.
Tips and tricks
- In the search results, IVs inherited from the male parent appear in blue, while those inherited from the female parent are pink. This can be very helpful when finding shiny frames, since switching the parents will still give you the exact same frame. For example, if you find a shiny frame with 31/31/1/1/31/31 IVs where both 1s are being passed down by the male, you can switch the male parent to one that has 31 in both Defense and Special Attack in order to have a flawless shiny!
- Forgot to take back the parents before hatching the Egg you wanted, and now the nursery lady is holding a new Egg for you? No cause for concern, you can refuse it! Simply use the "Set the Status after this Egg as Current" feature as usual, and then list all upcoming frames and use frame 1 to set as your current status, since refusing the new Egg will advance your chain by one frame.
2.4. Step-by-step example
Phew, that was a lot of information to absorb! Let's apply the process of Egg RNG step by step to a specific breeding project as an example. In this case, we will attempt to get a shiny Chinchou in a Dream Ball with its hidden ability Water Absorb, a Calm nature, and the best possible IVs (ideally 31/0/31/30/31/31, which grants it Hidden Power Grass). We have the following parents to begin with:
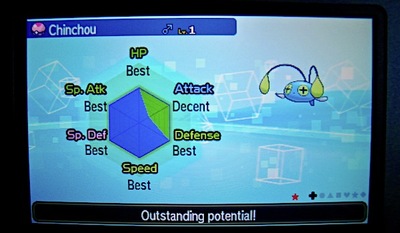
- A female Quick Ball Chinchou with Water Absorb and a Jolly nature, which we caught using S.O.S. battles. According to the IV Judge, its IVs are Best/Pretty Good/Very Good/Decent/Best/Best, which we will mark as 31/1/1/1/31/31 (anything that isn't 31, 30, or 0 is irrelevant).
- A male Dream Ball Chinchou with Volt Absorb and a Calm nature, which we received in a trade. Its IVs are 31/x/31/31/31/31.
- We're also fortunate enough to have a German Ditto (a region foreign to ours) with the IVs 31/0/31/31/31/31, which we received from a giveaway on Smogon Forums.
First, we will breed the two Chinchou together to get the Ball, nature, and ability we want in a single Chinchou; this will allow us to continue the process using the Ditto instead. Let's enter the parents' information in 3DS RNG Tool, check "Same Dex #" because these are two Chinchou, and see if we can get a decent parent to get going. In the filters, we'll lock in the Ball as the male's (to get a Dream Ball), the ability as "H" so it has Water Absorb, and since we gave an Everstone to the male Chinchou, we know all hatchlings will be Calm no matter what. As for the IVs, we'll enter all the 31s we want in the final Chinchou, but since we have no parent with 0 in Attack or 30 in Special Attack, we can leave these blank; aiming for only flawless IVs would be a stretch right now. Setting a range of 500 frames seems reasonable. Any further than that would take a long time to get, and we should be able to find what we want in that range. Let's see what results this yields!
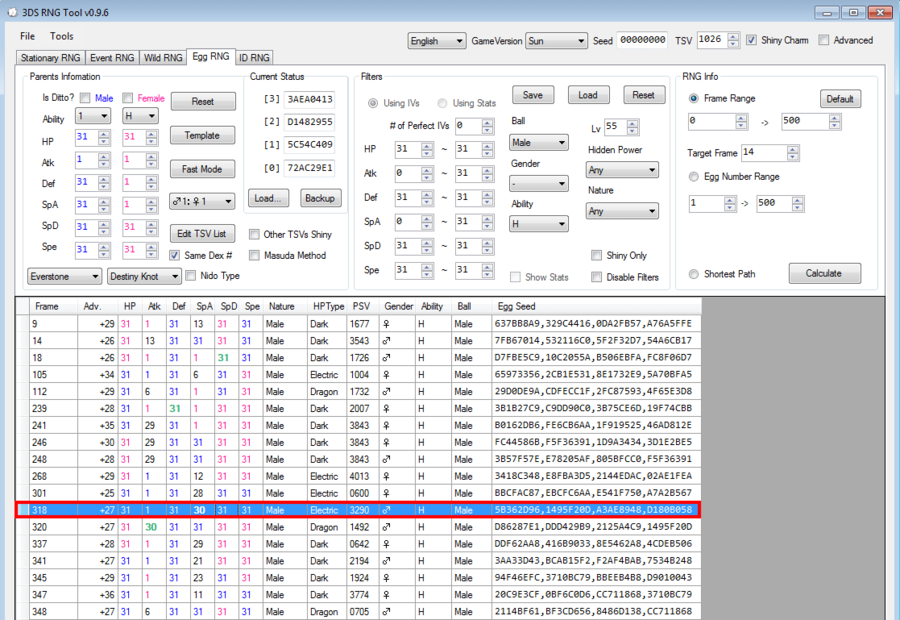
Looks like this our lucky day! The one at frame 318 has everything we want, plus the 30 we needed in Special Attack! It will take us longer to obtain than the first few results, but since we had no parent to pass down the 30 stat, this seems well worth the effort! Let's use the "Shortest Path" setting to see what we should to do obtain the Egg.
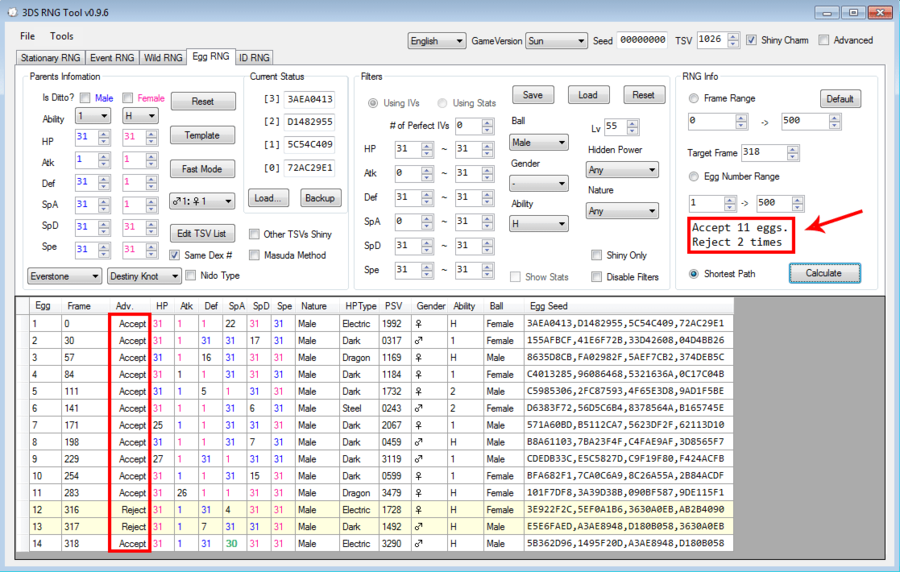
It appears we will need to accept 11 Eggs and refuse 2 (in that order), then the next one will be our 31/x/31/30/31/31 Chinchou with Water Absorb in a Dream Ball. This sounds reasonable, so let's do just that! As we accept and hatch the first 11 Eggs, we should regularly be making sure our hatchlings match the ones promised by the 3DS RNG Tool list.
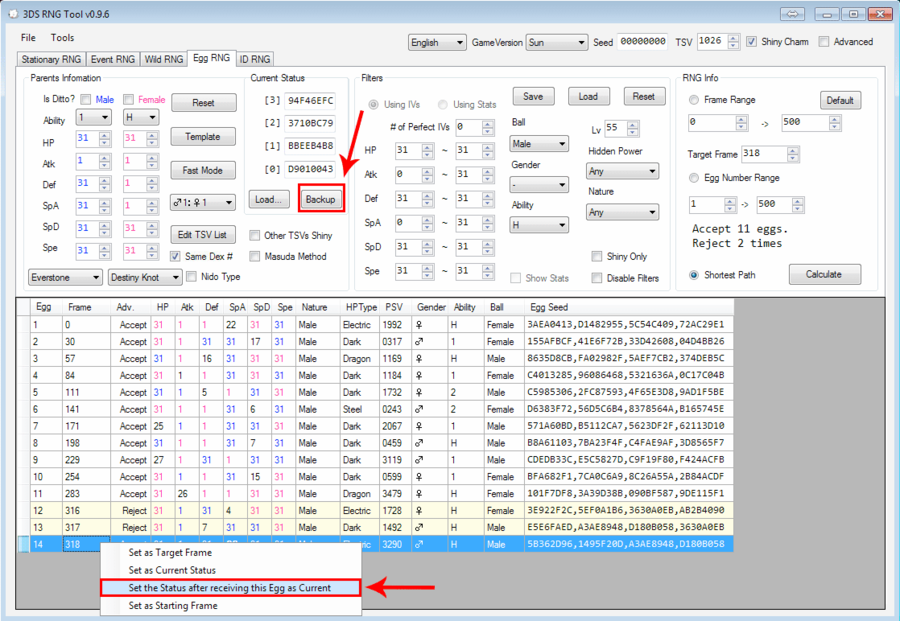
After accepting the final Egg from frame 318, let's make sure to immediately remove the parents from the nursery, right-click frame 318 in 3DS RNG Tool and select "Set the Status after receiving this Egg as Current" to update our Current Status. We will then backup the Current Status for safety.
Next, we will breed the Chinchou we just obtained with the German Ditto to try obtaining the shiny one we wanted. Let's update the parents' information, making sure to check the "Is Ditto?" box this time, as well as the "Masuda Method" box since the Ditto is foreign. Finding a shiny with Hidden Power Grass and flawless IVs is a very long shot, so we'll leave the Attack range at 0-31 and see what our options are. 50000 is a reasonable frame range when searching for a shiny; any more beyond that would require going through an insane number of Eggs. Here we go, fingers crossed!
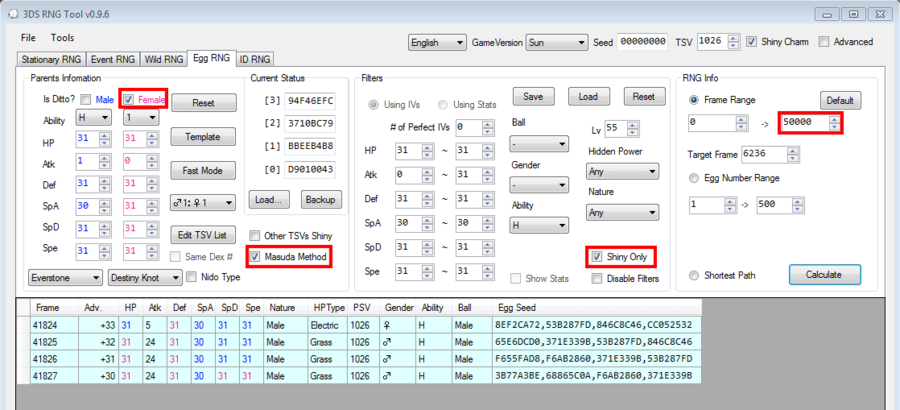
Ouch, not our lucky day after all! The closest ones are more than 40000 frames away. At least, three of them do have Hidden Power Grass, though their Attack stats are a bit high. Let's see how long it would take to reach these shiny Eggs by setting 41825 as the target frame and using the Shortest Path setting.
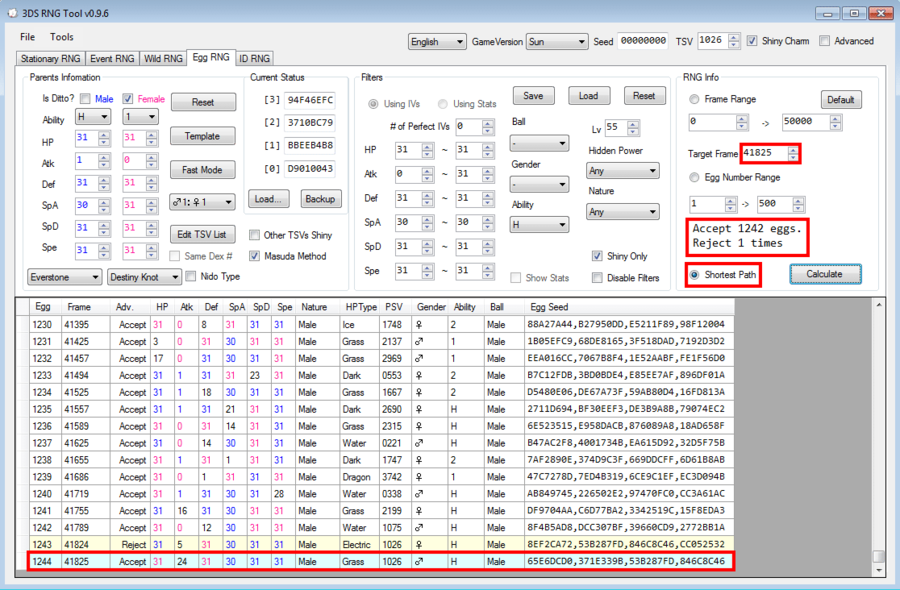
1242 Eggs to accept and hatch?! No way, we don't have that kind of time! Maybe we were a bit greedy trying to get Hidden Power Grass along with 5 perfect IVs. Let's run a new search in the 0-50000 frame range, but this time allowing Eggs that have 31 in Special Attack as well.
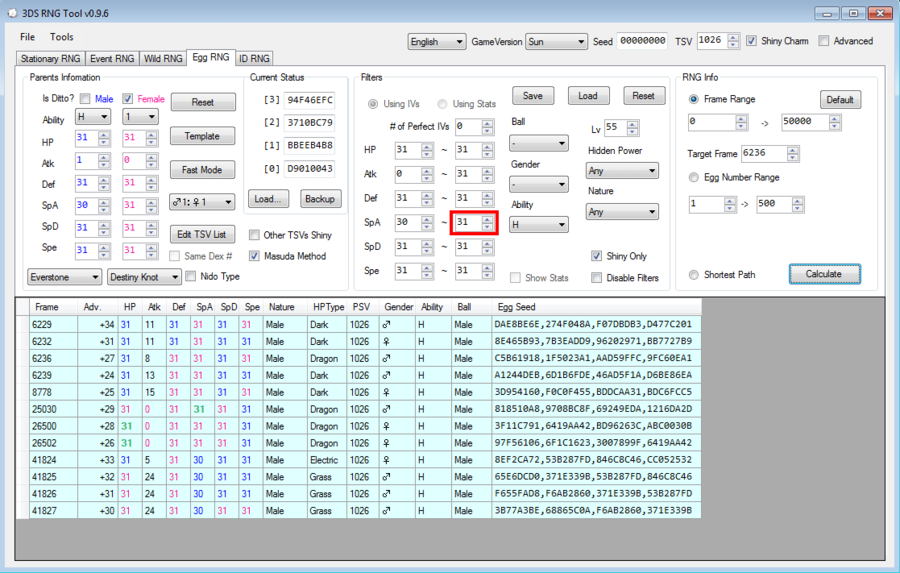
Well, those are some interesting options. We could actually get a 31/0/31/31/31/31 Chinchou by setting our target frame to 25030; this would be a pretty amazing shiny! But then again, we would probably still have to accept 700+ Eggs. Since we would like to be done with this project quicker, these shiny Eggs between frames 6229 and 6239 are looking pretty appealing. The one with 8 in Attack at 6236 would be reasonably good, so let's see how quickly we can obtain it using the Shortest Path setting.
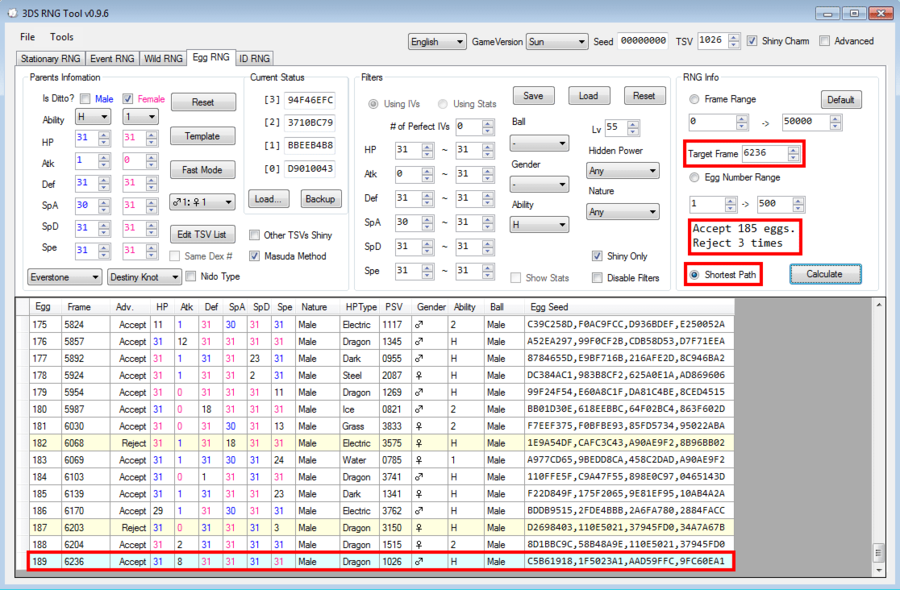
Accepting 185 Eggs for a such a good shiny Pokémon is fair, so we should probably settle for this! Keep in mind that the other shiny frames we found much further down the Egg chain will still be shiny if we use different parents, and some of them might even still be shiny without using the Masuda Method, so it could be worth checking by running a search and tweaking the inputs. In any case, not using them now will allow us to save them for a later project. As long as we don't go past the points they were at in the chain, those shiny frames will be waiting for us at those points.
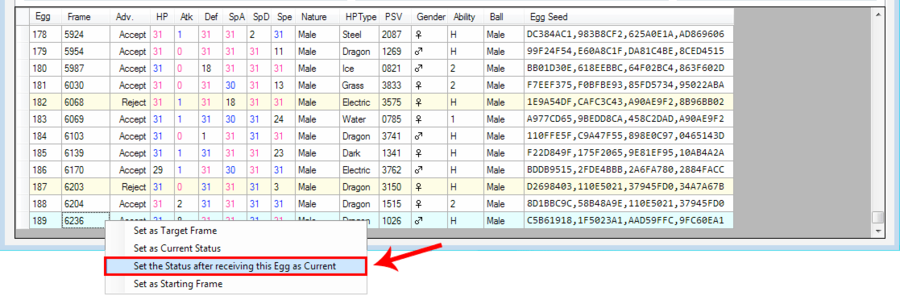
Now, let's go through the process of accepting 185 Eggs and refusing 3. The 3 Eggs we need to reject are not all grouped in a single spot, so we will have to be wary and keep a precise count to make sure the right ones gets refused. As we accept and hatch Eggs, we should regularly check our hatchlings to make sure they correspond to the predicted ones, and save the game when we know all is going according to plan, just in case a mistake happens in the future. Once again, after accepting Egg number 189, we have to make sure to remove the parents from the nursery to prevent any further Egg from being generated. We can then right-click frame 6236 in 3DS RNG Tool and pick "Set the Status after this Egg as Current".
Time to hatch the final Egg; let's go to Brooklet Hill to hatch it, since it would be a nice place to have as the hatching location in the shiny Chinchou's summary!
 |
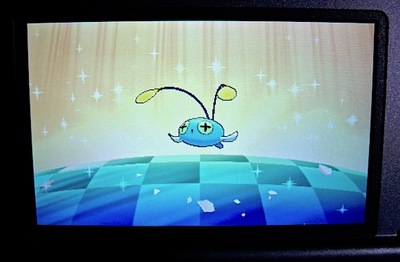 |
Yay!
You should now be all set to do Egg RNG on your own for years to come; happy breeding!
|